• HOME
  • Portfolio
  • Club CreatingYOU.®
  • About
  • Cookbooks
  • Blog
  • Search

Lori Rice

Photography | Styling

  • HOME
  • Portfolio
  • Club CreatingYOU.®
  • About
  • Cookbooks
  • Blog
  • Search

Free and Low Cost Food Photography Props

Free and Low Cost Food Photography Props

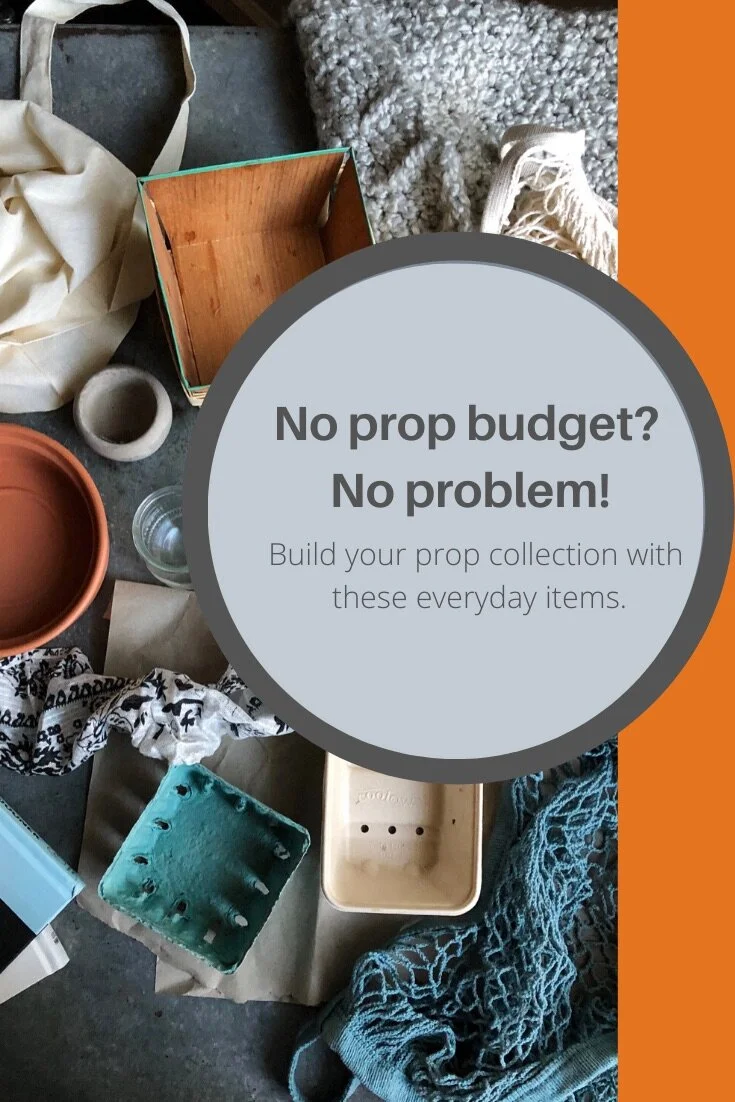
No prop budget? No problem!

No time to read? Click the play button and listen to this post instead!

Perhaps you are just starting out with no money to put towards a prop budget. Or maybe you just need a few photos here and there and spending money on food photography props simply doesn’t make sense. 

Even if you have a prop budget, who doesn’t want to save money and have a few extra items to work with?

I have so many items in my prop collection that I first purchased for an everyday use. By keeping a watchful eye you can shop smart and buy things that will serve a dual purpose. 

This means that you are essentially building your prop collection for free!

Below is a list of times to look for. I use these items all the time to style creative images for myself and for my clients. When you aren’t using them in the day-to-day, grab them for your photo set-up and create some killer food and product images.  


Terra cotta pot bottoms
That plate (or bowl) under a terra cotta pot that catches drained water? Grab it and wipe it down. The smaller, flat versions are great for garnishes. One with a deeper edge (those from IKEA are excellent) can be used as a shallow bowl. 


Yogurt and pudding jars
Finally, we have more options for glass yogurt jars in the States. The next time you need yogurt, opt for a few of these. Wash the jars in the dishwasher. You can use something like Goo Gone if the labels are difficult to remove. They are perfect for sauces and dressings. A similar option are pudding and dessert jars. I’ve been seeing more and more of these at Costco. 


Jam and mustard sample jars
You know the little jars that jams and condiment samples come in? Keep those, clean them up, and put spices or nuts in them for your set. 


Berry baskets
When you buy berries and other produce at the farmers market, ask the vendor if you can keep the basket they are displayed in. Most of the time the answer will be yes.


Reusable bags of all kinds
I’m big on making an effort to reduce plastic so I have all types of bags for produce, carrying groceries, and picking fruits and vegetables. White mesh, canvas, knitted bags - these can all styled into photos.


Amazon packing paper
You know the kind. All that brown paper that comes stuffed in that huge Amazon box with one small item in it. Yeah, that. Keep it. Brown paper can replace plates and platters for cookies and bars, trail mixes, sandwiches, breads and baked goods, and chips or fries. 


Bed and bath storage containers
Many of the items used for the bed and bath as storage solutions can serve as props. I have some small bamboo boxes and I can use the lids or the whole box. Some soap dishes can even work as small plates. 


Chunky sweaters 
Not kidding. I have an Instagram photo coming up soon that uses a chunky sweater my mom made for me to create a cozy coffee scene. 

Books
I know vintage books in photos are a bit of the rage, but you can use new books to create an interesting set, too. Just remove the jacket and you’ll have a clean, crisp, colored or white surface to stack a hot drink or cocktail on for a beautiful shot. 

Scarves
I can’t tell you how many times I’ve used a scarf as a linen in a shot. Lacey, silky and flowy, plaid, flannel, solid, print - they can all work. 


While I know that this won’t give you a complete prop collection, it does provide some no-cost options when you have a limited prop budget, or no budget at all. Keeping these types of things in mind for photography gets the creativity flowing and you’ll start looking at everything in your home or shop in a different light. 


Now go search around the house and see what you can find!

 
I love these tips! Let me know when there are more!


Need some creative inspiration? Grab a copy! A helpful guide with information that can be applied to all types of food and product photography!


10 Ways to Photography Banana Bread
tags: budget, low cost, food props
categories: Photography Props
Friday 11.01.19
Posted by Lori Rice
Comments: 2
 

Should I Use Photography Presets?

Should I use photography presets? | LoriRice.com

I often get asked if new photographers should use Presets? Or I’m asked if I use Presets? 

No time to read? Click the play button below to listen!

I’m not a fan of using presets and I don’t use presets from others on my photos.

And if you ask me if you should, I will tell you no as well. 


This is all a very personal decision. I know and admire many photographers use and sell presets. 

All I can offer is my reason for not using them. Actually there are two reasons. 

Let me back-up, though, in case you are unfamiliar with the term. You might be wondering - what is a photography preset?

When editing an image in a tool such as LightRoom you can change or enhance many characteristics of the photo to help it better reflect what you see as you snap the image. Brightness, contrast, saturation, sharpness. 

Once you make all these changes to one photo, you can save these changes as a preset. Then you can take that preset and apply these edits all the other images in your set. 

This is actually how I do use presets - I use those that I create myself.

So if I have a shoot of a pasta dish for a client and I have 10 images of different orientations and angles. I can edit one and then apply those same edits (since my lighting and environment was the same for all) to all the 10 images. It saves time and creates a consistent look. 

But a Preset is also something you can buy from other photographers who have created them. Then you upload them to Lightroom and apply them to your own photos. 

This is where my personal big NO comes in. 


Okay, the reasons. 

  1. One, I am a big advocate of creating images that are signature to you and your style. Even if you don’t feel like you have a style yet, you will get there. Trust me. I did not think I had a style. At all. And now people tell me they know exactly which photos are mine. It can happen naturally. Do not let it stress you out (like it did me for so long!).

    When you buy another person’s Presets and apply them to your own photos you rob yourself of the opportunity of being your own artist with your own unique likes and dislikes in terms of saturation, brightness, and all the things that make your photos YOUR photos. 


  2. Two, you miss the opportunity to learn basic editing skills that will help you grow as a photographer. You don’t have to be a full blown photo editor, but knowing the little tweaks to make to improve an image and improve it in a way that makes you like it more is invaluable. It builds your confidence and it’s something you can take back to your photo shoots. For example, if you are always brightening a photo in editing, you learn how to brighten your set or use your camera settings to do so. It translates to time saved in editing overall. 


I don’t think using Presets makes anyone less of a photographer. I just believe there are skills you don’t learn when you rely on them. Skills that will make you better at the craft over time.


If you use them for speed and ease of editing, try creating some yourself that reflect your style. Really play with all those buttons in LightRoom and see what they do. To this day (after 10 years at this) there are still things I discover in LightRoom from YouTube videos and instructional courses. You don’t have to be an expert. Just experiment. 


When you create your own presets, it can accomplish the speed you seek and create images signature to you, but you also become educated in necessary photo editing skills. A big win-win.


I want to be part of the most positive and supportive food and product photography community online. Keep me updated!

Confused to Confident: Food & Product Photography Training. Join us for this 8-week, 12-module online training with personalized support every step of the way!

tags: presets, photo editing
categories: Photo Editing
Friday 10.25.19
Posted by Lori Rice
 

What Are the Best Beginner Food Photography Props?

What Are the Best Beginner Food Photography Props?

I’ve been asked the question - what are the best props to start with for food photography? It’s a question that really prompts me to consider what items in my collection get the most use. 


Over the years, I’ve purchased items I was so excited about and used them once. Sometimes not at all if they simply didn’t end up looking the way I hoped they would in an image. It’s a mistake that has allowed me to better evaluate my purchases, stick to a budget, and keep my collection lean so props don’t completely overflow out of my home-studio.

I spent some time thinking about the core items I would have in my collection if I knew what I know now when I started out 10 years ago. 


I’ve narrowed it down to the eight best beginner food photography props. These are pieces I use time and time again, but the variety is enough that I can create multiple, different images by rearranging these props on a selection of surfaces or boards. 

Eight Best Beginner Food Photography Props

  • 6-inch plate

  • 8-inch plate

  • 2- to 3-inch side dish

  • 6-inch bowl

  • Natural, real linen napkin

  • 1 spoon

  • 1 fork

  • 1 supporting surface

The style and color you use for your props and where to get them is dependant upon your style of photography and the overall look (and feeling) you wish to produce.

Best Beginner Props for Food Photography from Lori Rice

Why these props? How would I use them? Read on. 

Plates

These are two sizes that I use repeatedly depending on how much food I’m plating (a starter versus an entree). An 8-inch is the largest I go for plating meals. 

Side dish

This can be a small plate or bowl. I regularly use them to hold garnishes, sauces, salt, and pepper. 

Bowl

Soup, stew, ice cream. I choose one that will work with it all, and this is my favorite size. 

Linens

I have an entire drawer full of linens (using the term broadly as a napkin for a shot). But the one I use over and over again is natural, real linen with a gray-tan hue. I have other colors, but I always come back to this one. 

Utensils

One spoon and one fork are really all you need to get started. 

Supporting surface

A supporting surface is simply a tool to switch things up with images. It’s most often a cutting board for me. But a larger ceramic platter, sheet pan, wooden plate, or even a shallow, flat basket will work, too. 

There you have it. While I certainly don’t want to give away all my props. If you told me I had to and that I could only keep a handful of things, these eight would be it!


Friday 10.11.19
Posted by Lori Rice
Comments: 1
 
Newer / Older

Our Privacy Policy and Terms of Sale. ©2025 Fake Food Free Productions, LLC.