• HOME
  • Portfolio
  • Club CreatingYOU.®
  • About
  • Cookbooks
  • Blog
  • Search

Lori Rice

Photography | Styling

  • HOME
  • Portfolio
  • Club CreatingYOU.®
  • About
  • Cookbooks
  • Blog
  • Search

Thrifting for glassware tips

If you told me I could only keep one type of prop in my collection for food and drink photography, I wouldn’t hesitate with my answer - glassware. I love glasses and many in my collection are from thrift stores. Others are upcycled from former bottles. The remaining come from sales at home stores. 

I’m selective when thrifting for glassware, though. I know what will and won’t make a good photo (meaning it aligns with my personal style) and I know what I will and won’t use the most. This skill comes from much trial and error. 

I’ve made many purchases that resulted in a glass sitting on my prop shelf without use. Because my studio and office are one room in my home, I don’t want those things taking up valuable space. To avoid this, first I refer to the questions I always ask myself before buying a new prop. 

Once those are answered, I consider the following things for glassware. Use them as tips when you are thrifting or shopping for your own. 


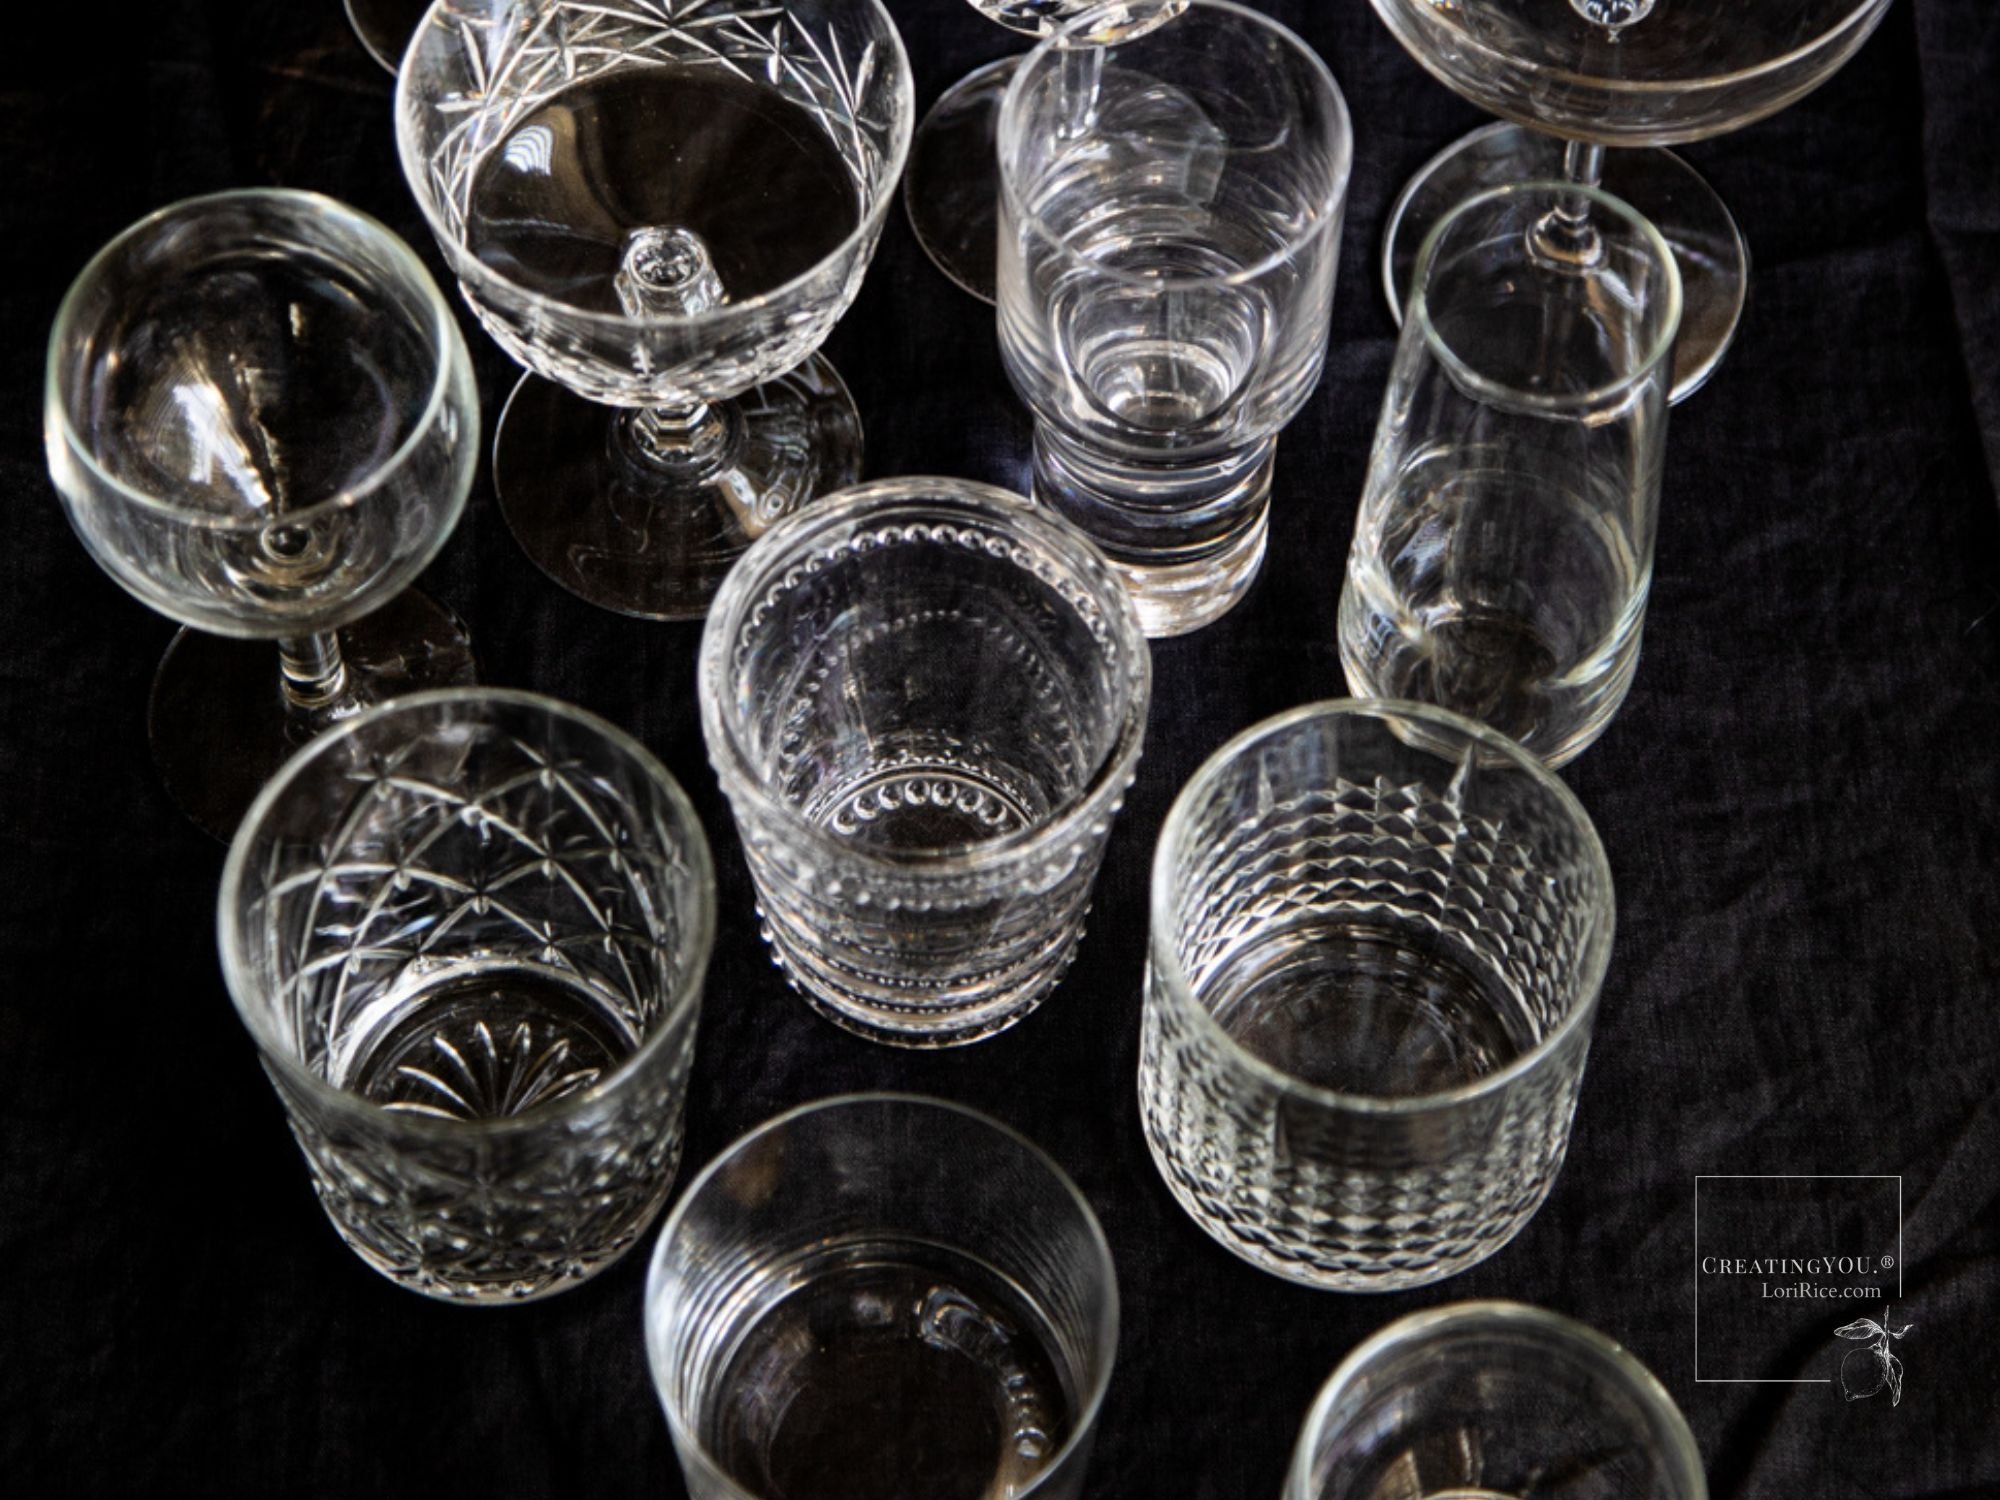
Tall and narrow - Tall, narrow glasses that aren’t too thick or bulk are great for cocktails, sodas, and smoothies. They are especially ideal when you want to show off a garnish because it stands out amidst the smaller diameter on the surface of the drink. 


Coupes of all kinds - Coupes are my favorite style of glass and that might be because manhattans and martinis are my favorite cocktails. I look for those with slightly different top edges - curled in, u-shaped, or squared off. They are also good for champagne. I find them much easier to photograph than tall, stemmed flutes. 


Careful with color - I do have a few colored or tinted and solid glasses. If I used a lot of bold color in my photography, I might have more. For now, I find two or three is enough. I like light tints so you can still see the drink and I always make sure the colors will work with other props I have. If the glasses are not transparent, I make sure I have an idea for use that includes a drink with an interesting visible top layer. 

More than one shape for wine - I rarely photograph standard stemmed wine glasses. I find them difficult to fit into most scenes I create. I do look for unusual shapes, though, and lots of stemless. Tasters work well for wine, too, especially to place around snack boards. 


Clean etched patterns - I love creating shadows with natural light and there is nothing like a beautiful etched pattern in a glass paired with the right time of day to create an original photo that can’t be replicated. I look for clean patterns, grids and sharp angles versus swirls or floral. 

Taster styles - It’s hard for me to turn down a small, taster-like glass. Not shot glasses, but those that might be used for craft beer, water, or spirit tastings. I look for interesting shapes. They work well when keeping the props on my set proportional. 

Too ornate is out - Large knobs of glass in the stem or swirly, floral etching rarely work for me. These might be your style and if so, go for it. But I know they aren’t mine. I’d have a difficult time using the glass in multiple photos, and I’d risk making my photos look dated. 


Singles or sets - When thrifting, it’s common to find glasses in full sets of 4 or 6. I have purchased a set of 6 because I loved the glass so much, but more often, it’s not worth it. The set takes up a lot of space, especially if you find yourself only using 1 to 3 of the same glasses all the time. It’s a tough decision, though, and one that can only be made by considering how unique or rare the glass is and how much storage space you have available. 


Featured
Figs.png
photography props, linens
Photography Props
Food and Product Photography Linens
photography props, linens
Photography Props
photography props, linens
Photography Props
6 Types of Linens to Diversify Your Prop Collection
linens, napkins, food props, food styling
Styling Tips, Photography Props
6 Types of Linens to Diversify Your Prop Collection
linens, napkins, food props, food styling
Styling Tips, Photography Props
linens, napkins, food props, food styling
Styling Tips, Photography Props
Content Link Block
Select a page and create a visual link to it. Learn more
Blog

Need some quick tips for creating your photos? I’m here to help with 12 years of experience as a solo stylist-photographer working with agriculture boards, brands, and publishers from my home studio. Be sure to grab my free CreatingYOU.® training:

5 Steps to Better Food and Product Photography 


tags: props, photography props, drink photography
categories: Photography Props
Tuesday 02.11.25
Posted by Lori Rice
 

Questions to ask before buying props for a food photoshoot

It took me about a year of styling and photographing food and product photos before I considered myself obsessed with props. Also a fan of clearance racks and a good deal, this became a dangerous combination. 

As I navigated the development of a personal style, I made many purchases resulting in props I rarely used. This meant I wasted money and quickly consumed what little space I had to store my photography supplies. 

Over the years, I’ve developed what I consider a good eye for knowing exactly what I need and what I don’t when a potential prop catches my eye. Now, I ask myself these three questions. Hopefully, they will help you when prop shopping for yourself. 


Does it immediately bring a photo to mind?

It has to be more than the prop that catches my eye. It has to create a vision in my head, a photo that I can envision it styled in. If it’s the item alone that I like, well, that’s art for my home, a personal purchase that I may or may not need. If I see it in a photo, then it’s a solid choice for my prop collection and a purchase for my business. 


Can I use it in multiple photos?

I don’t want to create photos that always look the same. If I used this with different backgrounds, light, or linens, would it create a new photo? Or would it look like I keep using the same prop. The props I buy need to look unique, but not so unique that I can’t keep reusing them. It’s a delicate balance that you get better at determining the longer you do this. 


Does it fulfill a need or solve a problem? 

On set, I often think - if I had one of (fill in the blank) it would work so well here or I need more options for (fill in the blank) for a better scene. Garnish dishes such as little cups and plates to hold hold herbs, spices, a spoon, or croutons are always on my list. Or it could be bowls, colanders, and baskets because I often photograph fresh produce. If the item I’m considering fulfills one of those needs, it’s an easy yes. 


Need more tips for your food and product styling and photography? I’m here to help with 12 years of experience as a solo stylist-photographer working with agriculture boards, brands, and publishers from my home studio. Check out my free resources. 

Take me to the freebies


tags: props, photo props, food props, food photography blog
categories: Photography Props
Monday 02.10.25
Posted by Lori Rice
 

Food and Product Photography Props for Styling Holiday Season Photos

Most photos start with the subject. But when I get stuck in a rut, constantly grabbing for the same prop over and over again, I find reversing the process so helpful. This is especially true during the holiday season. I gather every prop I want in the scene to create the mood I envision and the finally place the subject last.

It’s a great way to use props you’ve had forever, to discover the unexpected that is sitting around the house, and to decide what you truly need in a collection.

These are a few of my holiday photo prop ideas. The things I keep around to style seasonal photo shoots for both food and products.

Old white painted stool - I use this all the time. Found at a church yard sale for $2.

Baskets of all kinds - larger baskets are ideal for setting on the floor and filling with seasonal items like blankets.

Blankets - you can’t have enough for fall and winter photos and I find IKEA a great place to get smaller, thinner options that are less bulky and ideal for stacking.

Bundles of fabric - with or in place of linens or blankets, buying clearance fabric in large quantities can create a seasonal look that can be stacked.

Dried greens, plants, and flowers of all kinds - Trader Joe’s is where I get most of mine and let them dry on their own, I keep the ones that dry well.


Wooden bowls - for a classic look that works from Thanksgiving to Christmas.

Vintage cookie cutters and baking tins - always a favorite for holiday scenes.

Rolling pins - vintage are nice, but I also like printed versions for holiday-specific photos.

Heavy linens - moving into heavier fabrics like tweeds and flannels changes the mood of a photo for a seasonal look.

In-shell nuts - I’ve written about this one before and I love them for holiday photos.


Mesh shopping bags - these look as great with fall produce as they do with naturally wrapped gifts sitting inside.

Dried leaves and small branches - I gather them when I walk and sift through my collection each year.


Fuzzy table runners - they don’t have to be intended for that, just buy a few yards of something soft and bulky from the fabric store or use a scarf.

Candle holders - I keep red and green around for the holidays.

Pinecones - another thing I collect on walks and from old arrangements and wreaths that are discarded each season.

Antlers - a natural set painted white is perfect.


Matte scrapbook paper - I think these printed papers work well as a substitute for wrapping paper in photos versus glossy paper.

Paper gift bags - I go with brown but matte colors work, too.

Natural twine - this works well with other natural props and dried elements.


Love doing lots of different things? Download the free guide that proves you don’t have to niche down your creative business to succeed.


tags: holidays, food styling, props, photo props
categories: Photography Props
Thursday 10.10.24
Posted by Lori Rice
 

How to Create a Background for Food Photography

raddichio food photography on a wood surface and created background

Since I’ve been photographing while out and about the past few weeks while traveling, backgrounds have been top of mind for me. A few weeks ago, I wrote about embracing your background to create a sense of place with your photos. Today, I want to bring things back to basics with some ideas for things to use as backgrounds and how to capture them in your set. 

It’s easy to create a background for food photography and there are loads of options including things you may have around the house.

Vinyl surfaces

Let’s start with a more obvious one - vinyl surfaces. Because these are so light, they can easily be taped or tacked to a wall to create your scene. 

In the first photo, my vinyl surface is taped to the wall and the table is pushed up against the wall to meet it. In the second, same for the wall, but I have another vinyl surface on top of the table to create a new look. 

Hanging painted canvas

You can hang a painted canvas behind your set to create a textured wall. I’ve done this by draping it over a scrim or reflector arm holder in the past, but you can also use any kind of bar such as rolling hanging rack and drape it over or secure it with clamps.

The photo on the right is the start of the final photo that was used as the cover for my cookbook, Beer Bread. 

Draped linens

Sometimes you simply need to dress up a plain white or cream wall. A great way to do this is to install a closet hook at the top of your shooting wall. You can then add a standard hanger or create one with a rod and twine to drape a long linen or table runner. 

Propped up boards

I have a habit of propping up anything I can find to create the look I want for a photo. Sometimes this is a little risky because it isn’t quite as secure and could topple onto set, but for the most part, if I work quickly, I propping up boards or leaning solid surfaces against the wall works well. 

In the left photo, long boards are resting on the floor and leaning against the table. In the right photo, I have a vintage wood drying tray sitting on the table and leaning against the wall.

Curtains

I love backlight so it’s pretty natural to let curtains in a window work as my background. This is the same set, shot in two different ways. First, I draped a dark linen tablecloth over the curtain rod. When bright light hits it, it highlights the sheerness of the fabric. In the second, I used a sheer white curtain. 

Cookie sheets

If you have an old cookie sheet with a patina, it can make a dramatic background for a tight shot.

Contact paper

Prints are an acquired taste for food photos, but I love them. Taping or tacking contact paper onto a wall is a fun, affordable way to create the look of wallpaper. I leave the backing on and just tape it up, but you can also remove the backing and stick it to a foam core board to create a more stable background you can prop up. 

I hope this sparked some new ideas for backdrops!


UPDATES

My latest cookbook, The California Farm Table Cookbook, will publish June 18 and I cannot wait! Not only am I excited for it to be out in the world, but I have so many photos in it to teach from. I can’t wait to start sharing them with you. 

As a part of the release, events are being planned with more to come. You can learn more at the Events Calendar here on my website. The first one is in my home county where we’ll be having a launch party at Dresser Winery.

Looking even further ahead, I’ll be in Snohomish, Washington again this September to teach flower photography with Fleurs Creative. More details to come.


Club CreatingYOU.® has been running for several months now and I’d love for you to check it out. I’m keeping the membership at a super affordable rate on Substack with lots of helpful content to build your skills released each month. 

tags: styling, low cost
categories: Styling Tips, Photography Props
Friday 05.10.24
Posted by Lori Rice
 

Tips for Spring Egg Photos

My blog posts may contain affiliate links which means I earn a small referral fee if you decide to make a purchase.

A few years ago I tried naturally dying eggs and I had such great luck with using three methods - black rice, purple cabbage, and red beets. A couple years later, I tried again, varying the length of time I let them sit in the liquid. 

The deep colors led to some fun photos so I thought I’d break down a few ideas for photographing eggs for spring. Whether you dye Easter eggs or you want to capture the beauty of all those colorful farmstead eggs, these are a few of my ideas. 

Add natural elements. 

In these first two photos, I used this piece of driftwood that I found years ago on a hike. Well, that’s not true. I didn’t find it, my husband did. And he said - you could use this in a photo. He knows me well. 

I went much darker and moodier in this third photo because this was the year I let the eggs sit in that black rice liquid for a few days to see how dark it could get. I coordinated the colors with the scarf and plate and added dried flowers and greenery. 


Find fun egg cartons. 

I bought this 6-pack egg carton at the farmers market for the carton itself. I have used it in so many photos thanks to its natural color and that its size keeps the eggs from overwhelming other subjects in the photo. 


The octagon egg carton I found on Etsy a few years ago and had to order them. There are several versions available. Some sellers have them in colors as well.

Add interest to the shot. 

The two ways I love adding more interest to egg photos are with the table I photograph them on and capturing some of the floor below. The first photo is a small white table set on top of a plank wood surface that acts as the floor. In the second, I’m using a white wood stool over vinyl surface on the floor. It’s the same vinyl surface you see in the octagon carton photo. Oh, and baskets are always fun for eggs. 


Play with the ombré.


Whether you buy eggs or you dye them, you can take advantage of their colors and arrange them in shades for the shot. These brown eggs were purchased at the farmers market. I bought a few dozen so I’d have several shades to choose from. 

You could also pick one natural dye and leave the eggs in for varying times, 4 hours, 12 hours, and 24 hours, to get light and deep shades to work with. 


Here’s that post from my old food blog with my method for naturally dying eggs if you want to try it. Let me know if you do!


Don’t miss my free quick course:

5 Steps to Better Food & Product Photography
tags: eggs, farm photography
categories: Photography Props, Styling Tips
Friday 03.22.24
Posted by Lori Rice
 
Newer / Older

Our Privacy Policy and Terms of Sale. ©2025 Fake Food Free Productions, LLC.