• HOME
  • Portfolio
  • Club CreatingYOU.®
  • About
  • Cookbooks
  • Blog
  • Search

Lori Rice

Photography | Styling

  • HOME
  • Portfolio
  • Club CreatingYOU.®
  • About
  • Cookbooks
  • Blog
  • Search

Tips for Photographing a Picnic

Rather listen than read? Click play above.

My latest cookbook, the California Farm Table Cookbook, publishes next Tuesday! Revisiting all of the content I created for it has my mind on the work I did last year photographing outside around the state. That’s led me to revisit all the opportunities I’ve had to create and photograph picnic scenes.

Photographing outside is so much easier because there is loads of natural light, right?

That might be true for sunrise and sunset, but the rest of the day a quick snap gives you either a dull photo lacking directional light or a photo so bright it hurts your eyes. And what do you do when you want to photograph all the star dishes on the table? Is there a way to capture that layer salad at a better angle?

It’s the time of year when many of us are ready to bust open the sliding glass door and start dining outside. Here are some tips for capturing everything from your harvest to your filled picnic table, whether you create the scene or it’s there waiting for you. 

You’ll still need to create direction light. 

Your light source comes from all directions when you are outside, resulting in a dull photo. Use your boards just as you would in your studio to block light, darken shadows, or bounce light back onto the scene. Use your boards whether you are taking a quick shot of a pretty salad or freshly picked fruit on the ground, or working with a full table. 


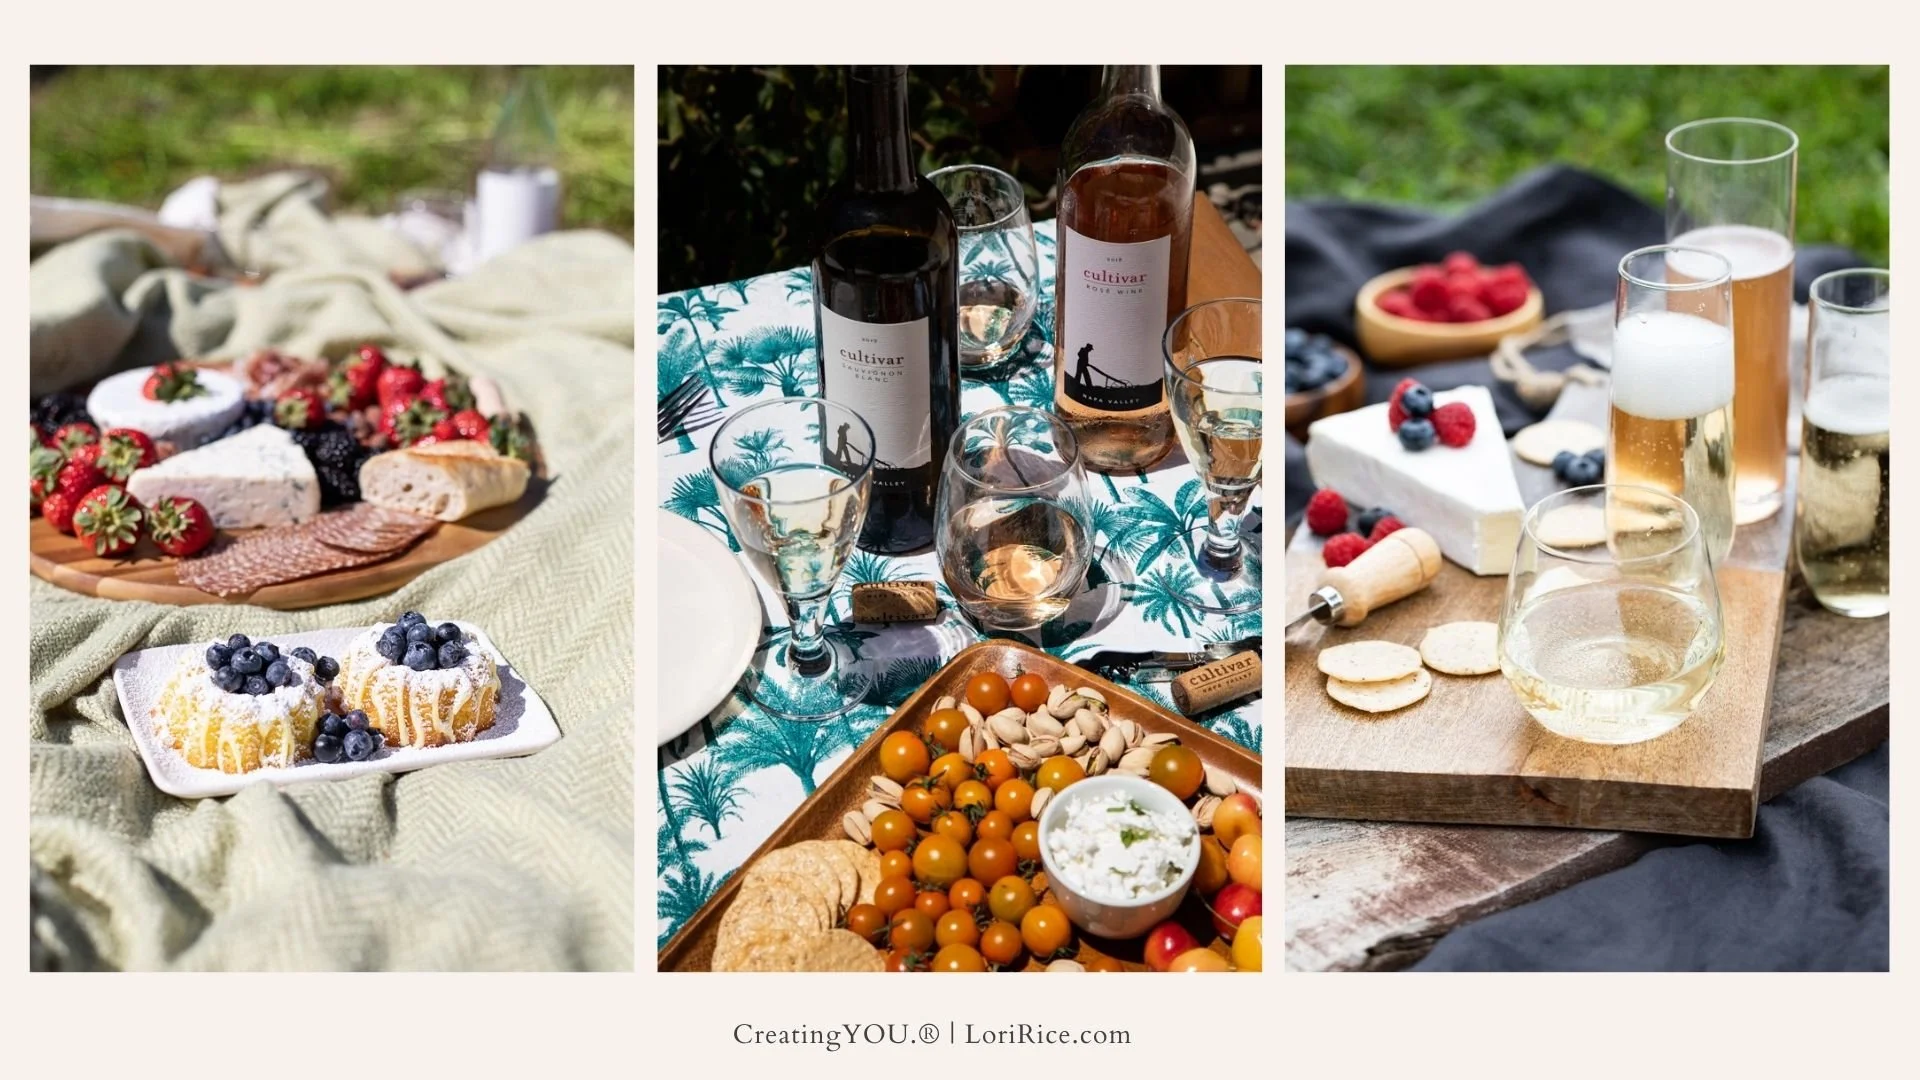
Style overheads step-by-step. 

1. Select your hero and place it. 
2. Place your supporting heroes.
3. Place your sides. 
4. Fill space with condiments.
5. Add extra props to create the scene. 

Add some assembly.

Burgers assembled or sliced, salads mixed, drinks poured. A little assembly creates action in the photo without having to set up the tripod and capture action when there are no one’s hands to capture but your own. 

Conform the style to time of day. 

If you can’t help shooting in the middle of the day when the sun is at its brightest, work with the light to create a style of photo that conforms to the brightness and boldness. Yes, scrims help filter light, but when working solo, they can be hard to manage. There are stands, but if you’ve ever worked in a strong breeze, you know these can be more trouble than they are worth. 

Accept the bold light, the contrast, the saturation, and have fun with it. Reduce highlights as needed in editing, and embrace a fun summer look that you may not have expected. 

Capture some background.

Whether it’s people mingling or simply some green grass, capturing some of your scene gives you a sense of place. Simply lower yourself and your camera to more of an eye-level position. 


Use fences and vegetation to create directional light or give a moodier background. 

Low bushes or trees, fences, and outdoor walls can take the place of a black foam core board that you’d use inside to deepen shadows. They are especially helpful on sunny days. Use them to help control the mood of your photo. 


This month in Club CreatingYOU.® we’re taking a deep dive into pies! I can’t wait to share my tips for styling and photographing all kinds of pies. If you work as a solo stylist-photographer, check out what this fun group is all about. 

Learn more

Grab the Free 5 Steps to Better Food and Product Photography training
tags: outdoors, picnics, styling, food sty
categories: Styling Tips
Thursday 06.13.24
Posted by Lori Rice
 

How to Create a Background for Food Photography

raddichio food photography on a wood surface and created background

Since I’ve been photographing while out and about the past few weeks while traveling, backgrounds have been top of mind for me. A few weeks ago, I wrote about embracing your background to create a sense of place with your photos. Today, I want to bring things back to basics with some ideas for things to use as backgrounds and how to capture them in your set. 

It’s easy to create a background for food photography and there are loads of options including things you may have around the house.

Vinyl surfaces

Let’s start with a more obvious one - vinyl surfaces. Because these are so light, they can easily be taped or tacked to a wall to create your scene. 

In the first photo, my vinyl surface is taped to the wall and the table is pushed up against the wall to meet it. In the second, same for the wall, but I have another vinyl surface on top of the table to create a new look. 

Hanging painted canvas

You can hang a painted canvas behind your set to create a textured wall. I’ve done this by draping it over a scrim or reflector arm holder in the past, but you can also use any kind of bar such as rolling hanging rack and drape it over or secure it with clamps.

The photo on the right is the start of the final photo that was used as the cover for my cookbook, Beer Bread. 

Draped linens

Sometimes you simply need to dress up a plain white or cream wall. A great way to do this is to install a closet hook at the top of your shooting wall. You can then add a standard hanger or create one with a rod and twine to drape a long linen or table runner. 

Propped up boards

I have a habit of propping up anything I can find to create the look I want for a photo. Sometimes this is a little risky because it isn’t quite as secure and could topple onto set, but for the most part, if I work quickly, I propping up boards or leaning solid surfaces against the wall works well. 

In the left photo, long boards are resting on the floor and leaning against the table. In the right photo, I have a vintage wood drying tray sitting on the table and leaning against the wall.

Curtains

I love backlight so it’s pretty natural to let curtains in a window work as my background. This is the same set, shot in two different ways. First, I draped a dark linen tablecloth over the curtain rod. When bright light hits it, it highlights the sheerness of the fabric. In the second, I used a sheer white curtain. 

Cookie sheets

If you have an old cookie sheet with a patina, it can make a dramatic background for a tight shot.

Contact paper

Prints are an acquired taste for food photos, but I love them. Taping or tacking contact paper onto a wall is a fun, affordable way to create the look of wallpaper. I leave the backing on and just tape it up, but you can also remove the backing and stick it to a foam core board to create a more stable background you can prop up. 

I hope this sparked some new ideas for backdrops!


UPDATES

My latest cookbook, The California Farm Table Cookbook, will publish June 18 and I cannot wait! Not only am I excited for it to be out in the world, but I have so many photos in it to teach from. I can’t wait to start sharing them with you. 

As a part of the release, events are being planned with more to come. You can learn more at the Events Calendar here on my website. The first one is in my home county where we’ll be having a launch party at Dresser Winery.

Looking even further ahead, I’ll be in Snohomish, Washington again this September to teach flower photography with Fleurs Creative. More details to come.


Club CreatingYOU.® has been running for several months now and I’d love for you to check it out. I’m keeping the membership at a super affordable rate on Substack with lots of helpful content to build your skills released each month. 

tags: styling, low cost
categories: Styling Tips, Photography Props
Friday 05.10.24
Posted by Lori Rice
 

Tips for Spring Egg Photos

My blog posts may contain affiliate links which means I earn a small referral fee if you decide to make a purchase.

A few years ago I tried naturally dying eggs and I had such great luck with using three methods - black rice, purple cabbage, and red beets. A couple years later, I tried again, varying the length of time I let them sit in the liquid. 

The deep colors led to some fun photos so I thought I’d break down a few ideas for photographing eggs for spring. Whether you dye Easter eggs or you want to capture the beauty of all those colorful farmstead eggs, these are a few of my ideas. 

Add natural elements. 

In these first two photos, I used this piece of driftwood that I found years ago on a hike. Well, that’s not true. I didn’t find it, my husband did. And he said - you could use this in a photo. He knows me well. 

I went much darker and moodier in this third photo because this was the year I let the eggs sit in that black rice liquid for a few days to see how dark it could get. I coordinated the colors with the scarf and plate and added dried flowers and greenery. 


Find fun egg cartons. 

I bought this 6-pack egg carton at the farmers market for the carton itself. I have used it in so many photos thanks to its natural color and that its size keeps the eggs from overwhelming other subjects in the photo. 


The octagon egg carton I found on Etsy a few years ago and had to order them. There are several versions available. Some sellers have them in colors as well.

Add interest to the shot. 

The two ways I love adding more interest to egg photos are with the table I photograph them on and capturing some of the floor below. The first photo is a small white table set on top of a plank wood surface that acts as the floor. In the second, I’m using a white wood stool over vinyl surface on the floor. It’s the same vinyl surface you see in the octagon carton photo. Oh, and baskets are always fun for eggs. 


Play with the ombré.


Whether you buy eggs or you dye them, you can take advantage of their colors and arrange them in shades for the shot. These brown eggs were purchased at the farmers market. I bought a few dozen so I’d have several shades to choose from. 

You could also pick one natural dye and leave the eggs in for varying times, 4 hours, 12 hours, and 24 hours, to get light and deep shades to work with. 


Here’s that post from my old food blog with my method for naturally dying eggs if you want to try it. Let me know if you do!


Don’t miss my free quick course:

5 Steps to Better Food & Product Photography
tags: eggs, farm photography
categories: Photography Props, Styling Tips
Friday 03.22.24
Posted by Lori Rice
 

Creating Sense of Place with Food Photography

Just about 2 ½ years ago I decided to rent a studio space outside my home. This was after nearly 10 years of creating my photos for clients in everything from corners of apartments to landings on the stairs to home offices. 

Today, I write this having just made the opposite move. 

This past weekend we moved into a new home, one we purchased with the intent of me moving my work back home. I decided to terminate my lease a few months early, as of the end of this month. 

The new studio space. A guest bedroom in our house.

I wrote about it on my Substack, From Every Corner of the World, with details about my experience with having a studio. The post is there if you’d like to read it. 

There were pros and cons of doing my creative work outside my home and I’m in that expected state of reflection. As I took a quick photo of my breakfast yesterday morning, I realized one thing I started to do rather unexpectedly was embrace the background in my photos. 

While it was having the space the studio granted me that prompted me to do this, I was unintentionally applying this to much more of my work in other places, proving that I didn’t really need space to accomplish it.

Embracing the background changes your photos. 

I love tabletop shots, but by catching a corner of your surface or a sliver of window, a photo tends to come alive. Environment evokes a whole new mood for an image and allows viewers to see themselves there. It creates a connection. 


Backgrounds don’t have to be beautiful. 

We create barriers when it comes to capturing more of our environment in a photo. I did for a long time. But backgrounds don’t have to be styled or beautiful. 

Using a shallow depth of field created by a wide aperture keeps a not-so-appealing background blurred. This photo I took this morning used f 3.2.

That quick shot of my breakfast this week that prompted this whole post.

A plain white wall, or a surface taped to the wall or board propped up behind the scene like the photos below works well, too. 

On the left, a mimosa photographed for the California Pomegranate Council. On the right, a photo for the article I wrote on creating a basic formula for salad dressings last year in Hobby Farm Magazine.


Keeping the background dark and showing the edge of your surface is another method. Drape anything in the background with a dark blanket or darken the background in Lightroom in post-production. 

On the left, a quick creative shot for myself after buying cherries at the farmers market. On the right, an autumn scene I set up in my old studio.

Move yourself to capture just the right angle of the set so that the hero is the focus and any clutter around the set is cut out. It allows you to still get a sense of the full scene where the event or action is taking place.

Both photos for my Farm Fresh Photos stock photography membership, taken in my old studio.

Pushing your boards or a table up against an open window creates interest as well. 

Both creative work for myself. The pie taken at home previous home studio. The pasta at my old rental studio.


Do you struggle with capturing more of your environment? Let me know.


We talked all about Prop Selection inside Club CreatingYOU.® in February, from choosing props to selecting colors. March’s topic will be announced soon. Come join us!

Club CreatingYOU.® is a community exclusively for solo creative stylist-photographers who want to grow their skills for capturing food, drink, and its origins while cultivating a distinct style. It’s always open to new members. 


tags: still life photography, lifestyle photography
categories: Photography Tips, Styling Tips
Thursday 03.07.24
Posted by Lori Rice
 

Styling and Photographing Brown Foods

One of the biggest struggles in food styling and photography is working with brown, beige, and neutral foods. Those that don’t give you a pop of color or interesting detail to work with. It challenges me often and it’s one of things you tell me you struggle with most.

The most common culprits are mushrooms, grains, and meats, especially those with long cooking times, such as stew.

There are a few things that you must incorporate into your set-up to ensure the best possible photos for these foods. Then there are a few more to consider as you troubleshoot the best options for making these foods look as good as you know they taste.

You must garnish. I’ve never been presented with a plate of neutral, beige food that did not require a garnish. You are at an advantage if you created the recipe as you can add pops of color and texture as needed. If you are photographing the food for someone else, you have to dig into a discussion with the recipe developer about what could be used to garnish the dish, and what is it made of. Just be sure that the final recipe reflects anything that is added. It can be listed as optional.

You’ll see garnish examples throughout the photos in this post, but the most obvious are chopped herbs and sprigs. It can also be chili oil, olive oil, and flake salt. Think in terms of both color and texture that can catch the light.

You must create directional light. Your light source must be coming from one direction only to highlight the detail of any brown food. Block it from all other directions and be sure it is hitting your hero spot.

Give meat movement. Add tongs, a fork, a spoon. And don’t be afraid to crop a few shots tightly to show texture and detail.

White plates and brighter sets solve most of my problems with brown foods. They allow the focus to be on the food making it pop more than if it were lost on a competing colorful or dark plate.

Use backlight if you prefer mood. Not everyone wants that white, bright set. Backlight can create a moody image while also catching the texture of the food and creating interest to the eye.

Hopefully those tips will get you started. Combine a few of them and see what you can capture the next time you are challenged with a neutral food.


More freebies, please.

Featured
Copy of Copy of Diptych (15).jpg
Cameras and Tech, Photography Tips, Styling Tips
photography, styling
My Favorite Styling Tools, Travel Essentials & Camera Gear (Minimal + Proven)
Cameras and Tech, Photography Tips, Styling Tips
photography, styling
Cameras and Tech, Photography Tips, Styling Tips
photography, styling
Fall (7).jpg
Styling Tips
styling, food photography, summer
How to Style and Photograph Frozen Treats: Tips for Solo Food Photographers
Styling Tips
styling, food photography, summer
Styling Tips
styling, food photography, summer
5.jpg
Photography Tips, Styling Tips
flat lay, styling, food photography, product photography
Flat Lay Photography: A guide to styling from minimal to cluttercore
Photography Tips, Styling Tips
flat lay, styling, food photography, product photography
Photography Tips, Styling Tips
flat lay, styling, food photography, product photography
 
tags: styling, food styling, food photography
categories: Photography Tips
Friday 01.19.24
Posted by Lori Rice
 
Newer / Older

Our Privacy Policy and Terms of Sale. ©2025 Fake Food Free Productions, LLC.